Monday, February 22, 2010

Springtime!

Looks like spring, smells like spring, must be spring...but it's February? Nonetheless, it was another beautiful warm and sunny day here in Seattle, so I'm not complaining.

This Crocus in the afternoon sunlight was beckoning for attention. Enjoy!

Monday, February 15, 2010

Short Ribs and Gnocchi

Valentine's Dinner...what to cook?!

Valentine's Day for me and my Sweetie this year is a bit special, as it marks a date just short of a month before our 10-year Anniversary. So, what kind of dinner can I make to celebrate the occasion? It had to be something substantial, as this is a special occasion, and it had to be something new, that I had never cooked before.

I chose Beef Short Ribs, because they just sounded good, and I had never attempted the whole braising method on this particular cut before. For a starch, I decided to go with Gnocchi in Browned Butter and Sage. While somewhat time consuming, the beef ribs were well worth it, and actually not that much actual work. As for the gnocchi, I cheated a bit and went with a prepared, refrigerated option that I found at my local market; they were OK, but not as good as I've had in some of my favorite Italian restaurants. I think next time I will have to make them from scratch.

Beef Short Ribs and Gnocchi for Two: (I used this recipe as a starting point)

Ingredients for beef
    2 lbs Beef Short Ribs (this turned out to be 4 pieces, rather large, meaty cuts - they may vary Olive oil
    1/2 cup diced onion
    1/2 cup diced carrot
    2 medium garlic cloves, minced
    1 tsp ground coriander
    1 tsp ground cumin
    1 tsp chili powder
    1/4 cup beer
    1/2 cup red wine (I used a Cabernet Sauvignon, since that's what we would be drinking later with the dinner).
    1/2 cup crushed canned tomatoes
    1/4 cup chicken stock (recipe called for Beef Stock, though I had homemade chicken stock on-hand)
    Salt & Freshly Ground Black Pepper
Ingredients for gnocchi
    10 oz package of refrigerated fresh potato gnocchi
    Fresh sage
    Butter
    Chicken Stock
For the meat:
    • Preheat oven to 325° F
    • Season the meat on all sides with salt and pepper.
    • Heat a a few tablespoons of olive oil in a medium-sized heavy oven-proof skillet, brazier, or enameled cast iron cookware (one with a fitted lid) on the stove.
    • Brown all sides of meat in the skillet and then remove to a plate. Drain off most of the remaining fat from the pan and return to heat.
    • Add carrots & onion and about a 1/4 tsp Salt to the hot pan and cook to to brown the onions. (add a bit more oil if vegetables stick to pan)
    • When vegetables are browned and aromatic, add the beer and allow to reduce, scraping the bottom bits from the pan.
    • When reduced, down, add the garlic, coriander, cumin, chili powder and stir to incorporate.
    • Follow by adding the wine, crushed tomatoes, stock, and 1/2 - 3/4 cup water to the pan.
    • Return the meat to the pan and bring to a simmer, then cover with lid and place in the oven on the center rack.
    • Cook for 3 hours, turning the meat over a few times in the sauce.
    • When finished cooking, remove ribs and place in baking dish fitted with a lid, and transfer sauce to a suitable sized measuring cup, or jar and refrigerate.
    • After 30 - 40 minutes, remove sauce from fridge and skim of fat. Then puree the sauce with an immersion blender or in a free standing blender.
    • Pour sauce over ribs and return the baking dish to an oven set at 325° F, and reheat meat and sauce for about 45 minutes, or until heated through.

    For the Gnocchi:

    • Boil 10 oz. prepared Gnocchi according to the package instructions (3 mins, or so).
    • Place about 4 tablespoons butter in a skillet on medium heat, and allow to brown (not burn), until the butter is clear and amber colored.
    • Add about 10 - 15 fresh sage leaves to the butter and the drained gnocchi.
    • Fry the gnocchi in the butter until the are slightly browned and the sage leaves are wilted, then add a few tabelspooons of the chicken stock and swirl the pan a bit and allow stock to evaporate.
    • Season with a bit of salt and pepper to taste.

    Spoon a bit of meat sauce out onto two plates and place the meat to one side or the plate. Serve gnocchi along side the meat.

    Thursday, February 11, 2010

    For German Butchers, a Wurst Case Scenario

    I wanted to share this article from the Smithsonian: For German Butchers, a Wurst Case Scenario. The article chronicles the recent demise in German butcher craft.

    As a food lover, and descendent of German immigrants, I found the article very interesting. It is sad to see the "progress" of modern societies in Germany moving to mega-mart style commodity foodstuffs; following in the footsteps of the U.S. consumerism plight.

    From my early days as a child, I can remember my grandfather's small farm, and the occasional slaughter and processing of a hog. It was amazing to see all the different uses of every piece of the animal in many different cuts of meat, sausages, etc. My favorite was always a version of smoked, dried sausage that was processed, hung and cured in a small smokehouse out on the property. These sausages were flavored with a good amount of pepper and garlic, and being cured and requiring no refrigeration, they were a great addition to take along for a picnic, hike, etc.

    The German butcher and delicatessen model seems to be disappearing as operators either go out of business, or slide in quality due to the younger generation’s lax demands for real quality and authenticity. Even where I grew up in South Texas, where many Germans settled in the late 1800's and early 1900's, it is becoming harder to find a really good version of what I ate as a child, and what my grandfather produced at slaughter time. For better or for worse, I guess this is what we have.

    Despite my disappointment sprouting from an ever-decreasing real food marketplace, I am still hopeful that a small population of younger people will revive some of the older food traditions and recipes. While there are far less options than before for craft style food, I am very happy to support the remaining purveyors in my area.

    One place in particular is Hans’ German Sausage and Deli, just south of Seattle, WA in Burien. At Hans’, you can find a variety of sausages and meats made in-house. In addition to meats, they also have the expected other German and European food imports, as well as German style breads brought in from near-by artisan bakeries. This place is a must visit if you are in the area and interested in German food and supporting local business.


    In addition to Hans’, I thought of a few other great places I have come across in the past where you can find some German meat delights! I would love to hear your comments on any great local food outlets carrying on traditions in your area.

    Bavarian Meats (Seattle, WA)

    Uli’s Famous Sausage (Seattle, WA)

    K & K Foodliner Ltd (Edmonton, AB, Canada)

    Granzin’s Meat Market (New Braunfels, TX)

    Wednesday, February 10, 2010

    Gravlax

    While out on a run the other day, I noticed my local fish market had Fresh King Salmon noted on their placard out near the sidewalk. Immediately, my mind wondered to thoughts of how, what, when can I incorporate salmon into my next few days of meals..? This challenge is doubly complicated by the fact that my wife has, after having lots of Pacific Northwest salmon in the few years we've lived in the area, become a bit picky and aversive to "another salmon dish...".

    So, my challenge - to do something different with salmon; different than grilled, cedar-planked, baked, broiled, poached, etc.

    My idea - Gravlax, the traditional Scandinavian preparation of fish (usually salmon), which utilizes the process of osmosis to cure the fish meat via packing it into a blend of salt, sugar and blend of spices.

    My recipe is fairly basic:

    ¾ lb salmon fillet, tail end (all bones removed)
    ¼ cup kosher salt
    2 Tbsp sugar
    2 tsp fennel seed
    2 tsp black peppercorn
    Handful of fresh dill sprigs (~20 stems)
    Aquavit
    • Coarsely grind the fennel seed and black pepper together in a spice grinder, blade-style coffee mill, mortar and pestle, or other.
    • Mix spices, salt, and sugar together.
    • Lay out a large piece of plastic kitchen wrap on a work surface, and distribute a bout 1/3 of the salt/spice mixture onto an area in the middle of the plastic, about the size of the fish fillet.
    • Place the salmon fillet, skin side down onto the distributed mixture, and then pack the remaining salt/spice mixture on top and on the sides of the salmon.
    • Tear the smaller sprigs of dill off the larger stems and roughly chop or tear those pieces into smaller pieces. Distribute on top of the salt/spice mixture.
    • Douse the top of the dill with a bit (about 1 oz) of the Aquavit.
    • Pull the side of the plastic wrap together, overlapping tightly to contain the piece of fish.
    • Double wrap the fish again with more plastic wrap.
    • Place the fish in a shallow dish, and refrigerate for 2 – 3 days, turning at least once a day to redistribute the brine juices.
    • When fish has firmed up slightly, unwrap and rinse.
    • Slice across the muscle, on a bias.
    • Serve with capers and sliced onion or shallot, or on a bagel with cream cheese, etc. and enjoy!

    Saturday, February 6, 2010

    Kimchi

    As my latest blog postings have revealed, I've been spending some time in the kitchen lately. I have enjoyed this time immensely; playing around and trying new recipes and techniques, and doing a bit of food photography along the way! Today's post is no exception...

    Here's a glamour shot of my latest kitchen adventure, kimchi. I had never made this before, and after doing so for the first time, I wondered why. More importantly, I wondered why I ever paid so much for a jar of the stuff at my local Asian market?! It is easy to make, and yields a good amount of Kimchi for your eating pleasure. This kimchi turned out great, and is on par with what many restaurants in the area serve - very authentic!

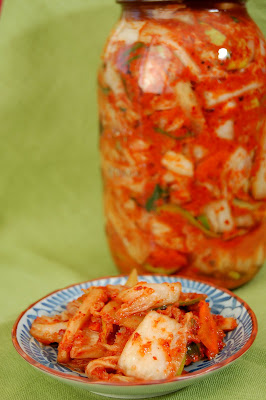
    Rather than posting the recipe that I used, I recommend you check out Maangchi's Easy Kimchi. This is the recipe I followed and, as a bonus, there is handy video to show you exactly what to do. While you're there, you can peruse through her many other great recipes and cooking demonstrations. The site is filled with a lot of informative how-to's to get you started with the basics of cooking Korean food!

    Friday, February 5, 2010

    Cinnamon and Cayenne Spiced Chocolate Cookies

    Yesterday morning I came across this recipe for spicy "Hot Mama" chocolate cookies posted by Amber Turpin over at Civil Eats, and I had to make them. These cookies are easy to make with just a few ingredients. The subtle heat from the mix of cinnamon and cayenne pepper compliments the intense cocoa flavor nicely. While these cookies are good for all-around snacking (what cookies aren't?), they also pair well as a contrasting dimension of flavor with cold dairy desserts such as vanilla ice cream, or just a plain old glass of milk!

    Monday, February 1, 2010

    Homemade Yogurt

    Let me start off by saying I have always wanted to make my own yogurt. I know it might not sound like anything too big, but for some reason the idea of making yogurt has been one of those things I have put off for the past few years. So, earlier this weekend I committed myself to making my first batch of homemade yogurt.

    My project started off with the selection of the main ingredient, milk. I chose to go with a tasty grass fed raw milk from a vendor at my local farmer's market. While I used raw milk for this, yogurt can be made with any kind of milk, pasteurized skim, low fat, whole, cow, goat,etc.

    To begin, I placed a quart of milk in a stainless steel crock, and placed that inside another larger pot filled with a bit of water on the stove. This was done to create a double boiler effect to some extent. Basically you want to be able to heat the milk without scalding with direct heat of your stove flame of burner.

    Next, I heated my milk up to about 180 degrees F to pasteurize it and create a clean slate for the yogurt cultures to ferment the milk. This was a step mentioned in most of the recipes, though I am not totally sure it is needed. Reasons being, on one hand you have clean raw milk, that if collected and handled in a sanitary manner, is very safe and contains enzymes and other naturally occurring biological components that aid in it's microbial stability. On the other hand, you have a pasteurized milk product that has been heat-treated to kill pathogens that might occur from contamination prior to packaging. I am not sure I will employ this heat step next time.

    After I heated my milk, I immediately cooled it down to about 120 degrees F in a cool water bath (drain hot water from larger boiler pot, and fill with cool water from the tap). At this point it was time to add my starter to introduce the live cultures that would ferment the milk. I stirred in about 1/2 cup of commercial low fat yogurt purchased from my local grocery store.

    At this point, the mixture was ready to sit for about 6 hours at 110-115 degrees F. To create this temperature holding environment, I used a heating pad and a small cooler bag. I placed the heating pad inside the cooler bag and wrapped it partially around my crock of milk, which I covered with a towel. I also placed a temperature probe in the milk, so I could track the temperature over the fermentation time and make sure I was staying in the 110-115 range. Then I waited...


    After six hours the yogurt had firmed up, signaling to me that the fermentation was finished. I covered the crock with some plastic wrap and placed it in the refrigerator overnight.

    Though it was a lengthy process, I can easily see myself doing this more often. Outside of the initial heating and mixing, most of the production time involves no effort, and the results are well worth it!